Library for PDM microphones for RTL872x (P2, Photon 2) and nRF52 (Boron, B Series SoM, Tracker SoM, Argon)
Digital MEMS microphones are commonly available in I2S and PDM interface. This library only supports the PDM (pulse-density modulation) interface.
PDM MEMS microphones are generally designed for voice use - not for high fidelity audio.
Adafruit has two breakout boards:
Both are US$4.95 and there is more information available at Adafruit. The boards include a MP34DT01-M (PDF datasheet).
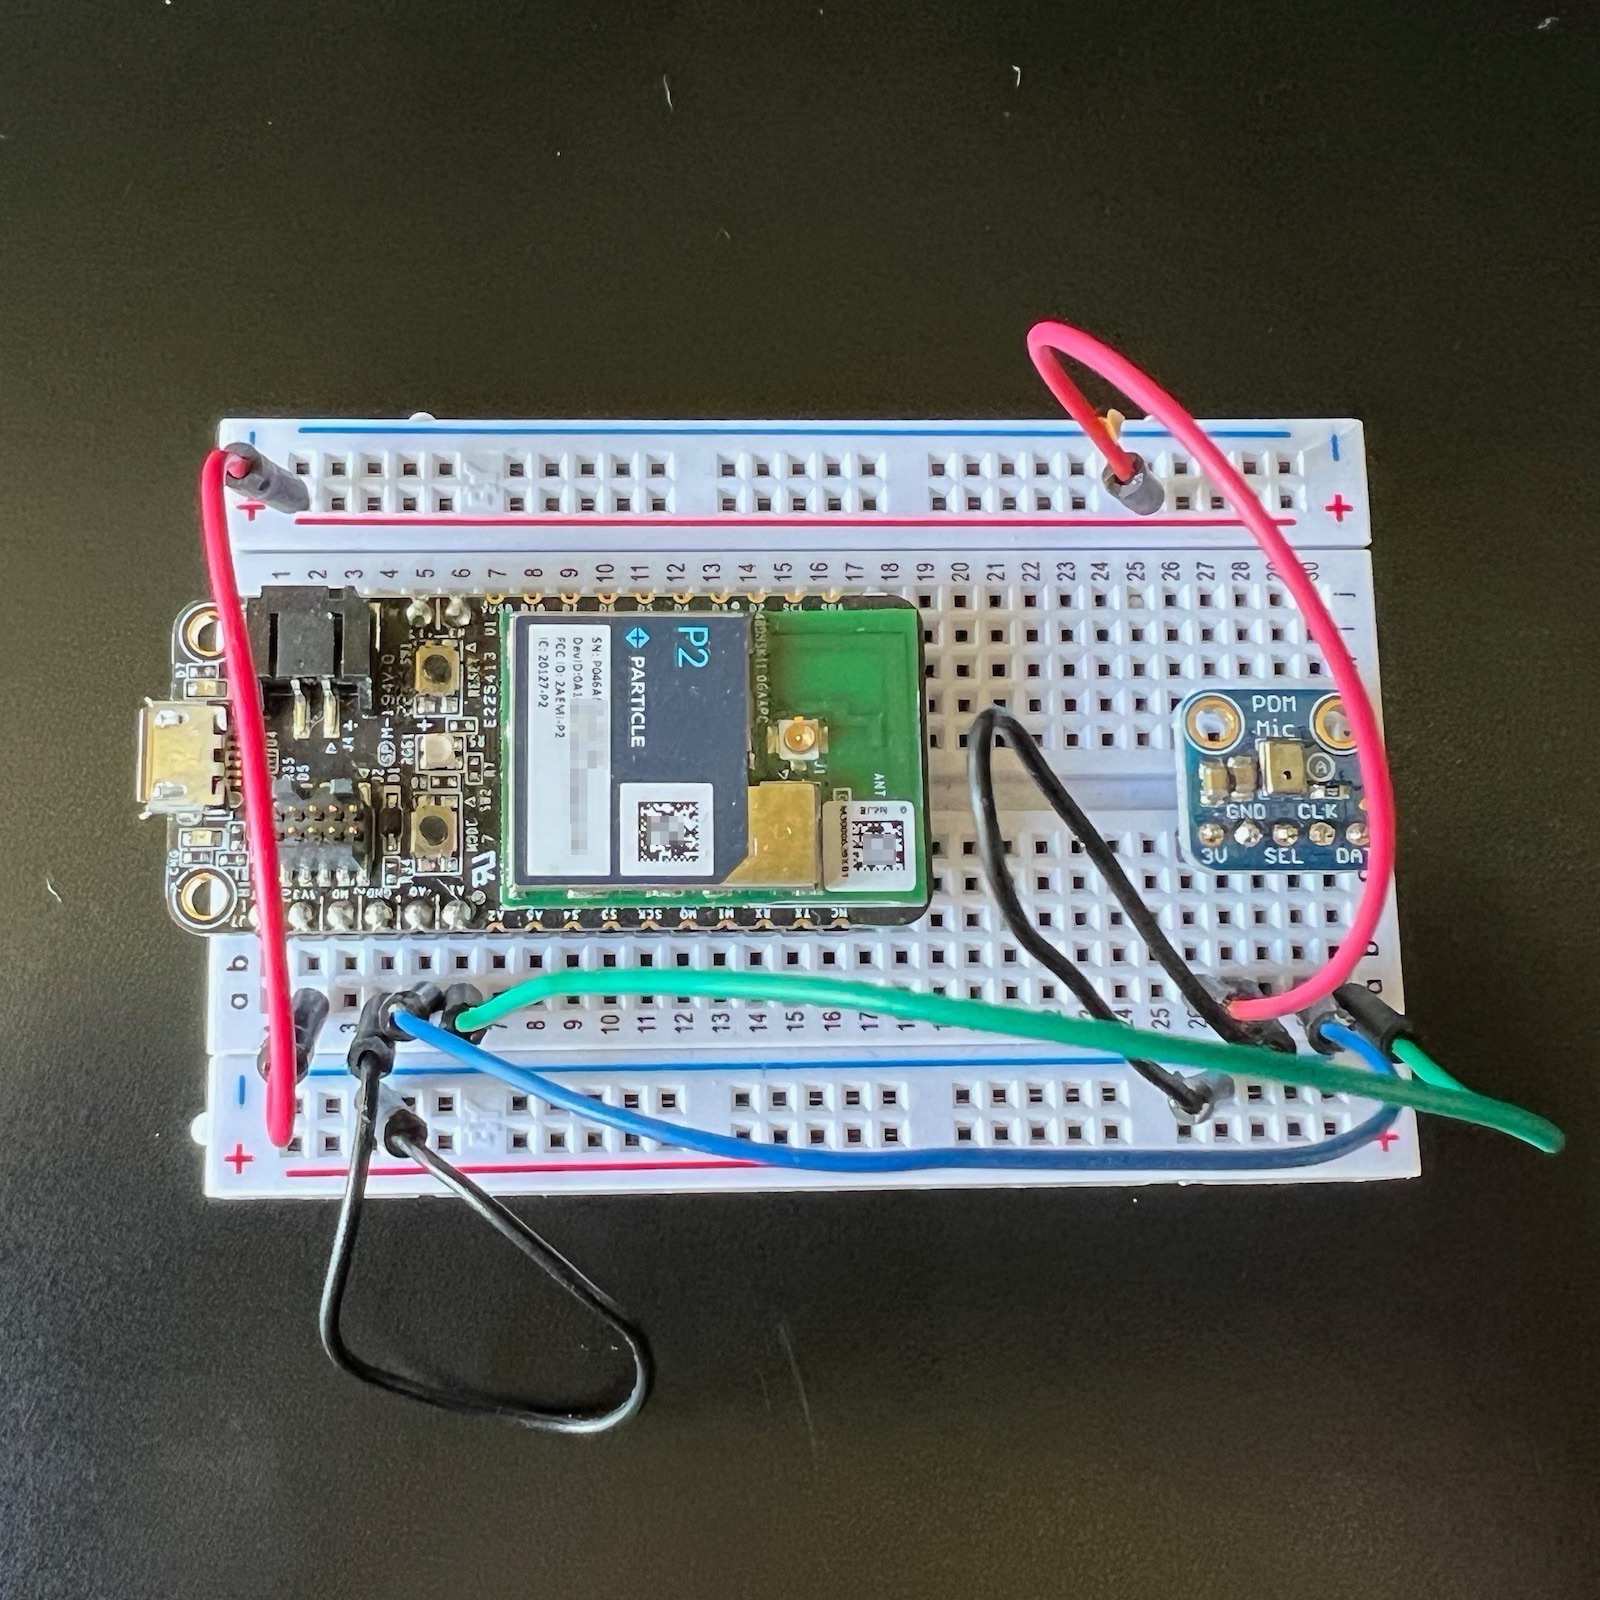
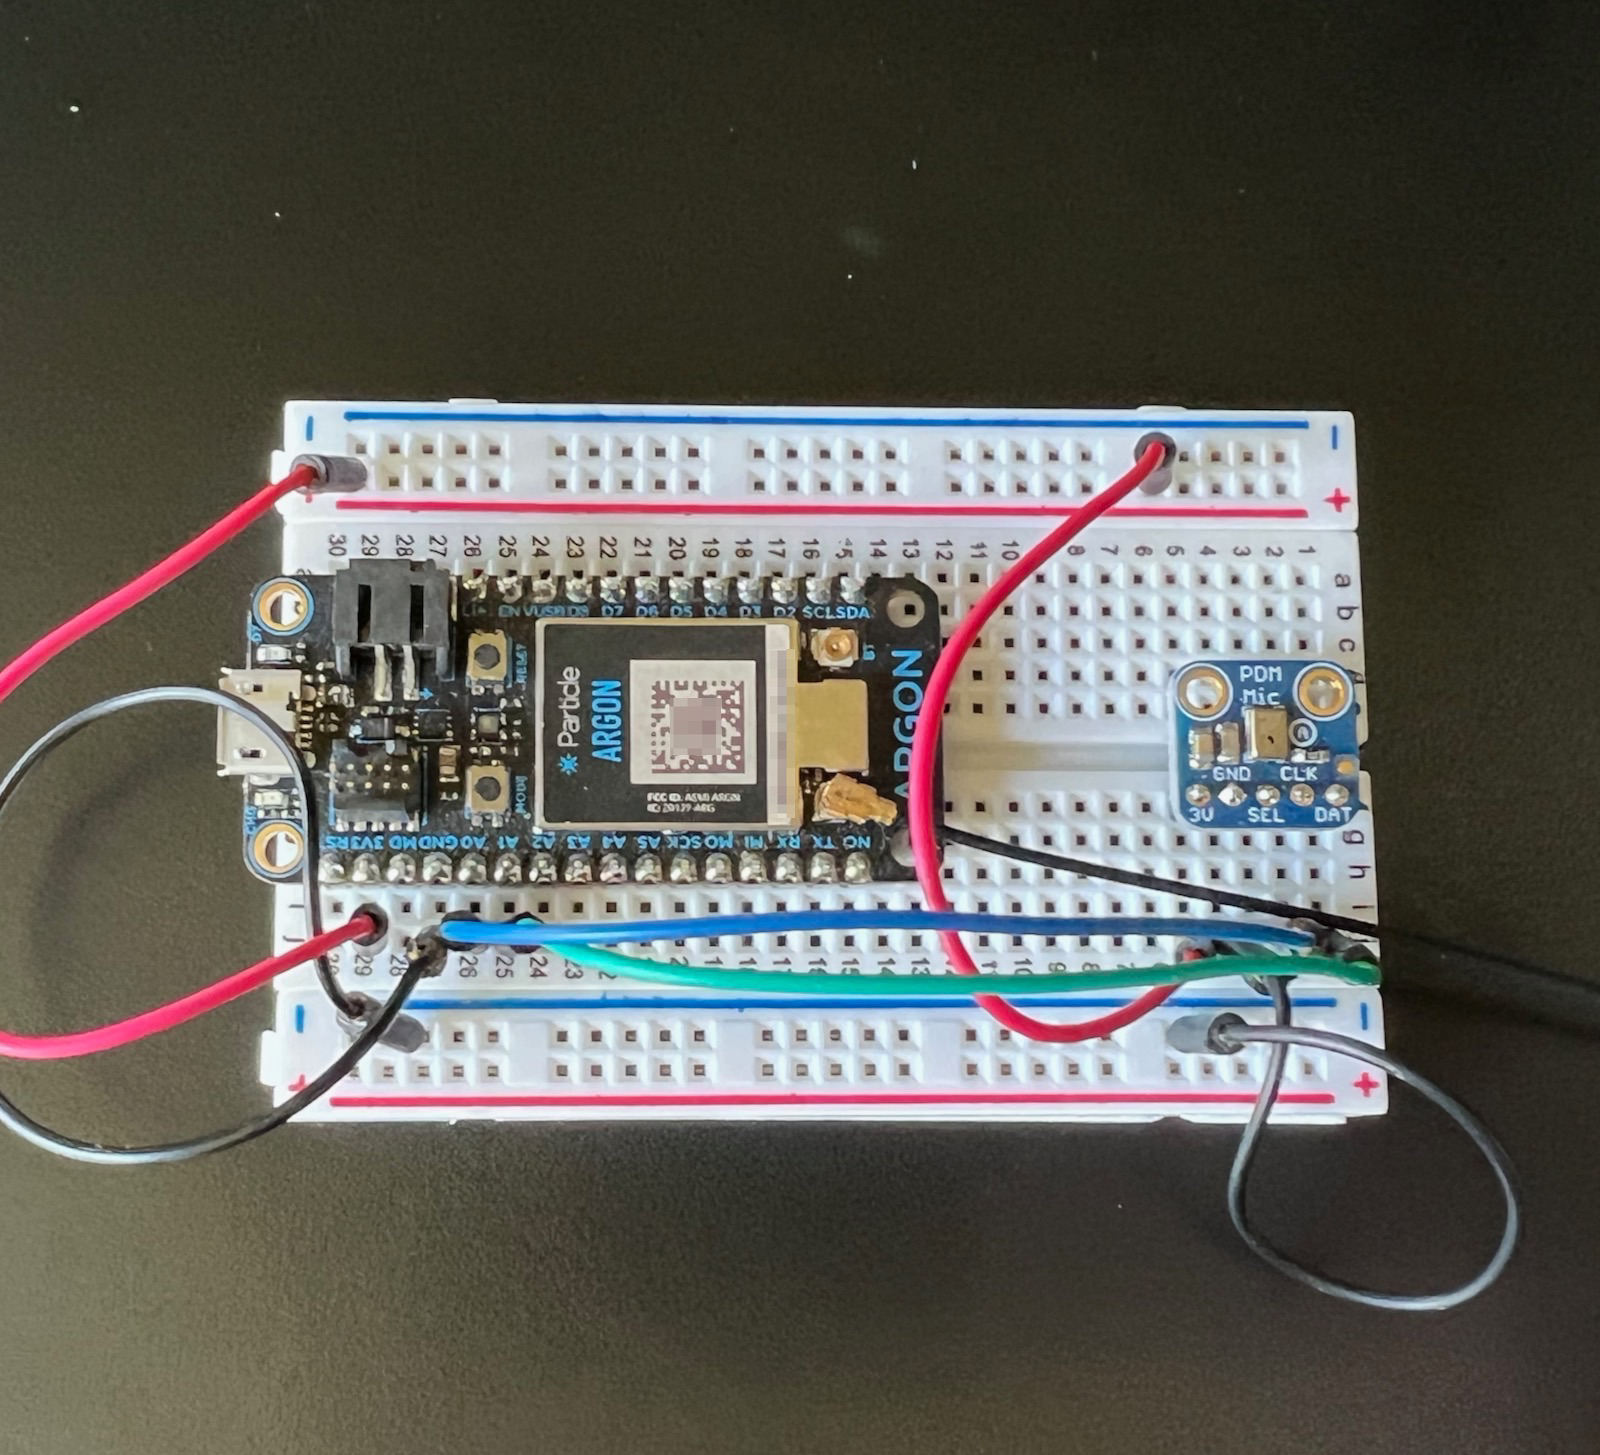
The pins needed for Adafruit PDM microphones are:
| Breakout Pin | Particle Pin | Description | Color |
|---|---|---|---|
| 3V | 3V3 | Power 3.3V | Red |
| GND | GND | Ground | Black |
| SEL | Left/Right Select | No Connection | |
| CLK | A0 | PDM Clock | Blue |
| DAT | A1 | PDM Data | Green |
- SEL - Left/Right select. If this pin is high, the output is on the falling edge of CLK considered the 'Right' channel. If this pin is low, the output is on the rising edge, a.k.a 'Left' channel. Has a pull-down to default to left so you can leave it unconnected.
- CLK - PDM clock into breakout board, 1 - 3 MHz square wave required.
- DAT - PDM data out of breakout board
On the nRF52 (Boron, etc.) the PDM CLK and DAT lines are configurable to other pins, but on RTL872x (P2 and Photon 2), only A0 (CLK) and D1 (DAT) can be used.
On both MCUs, the built-in hardware PDM decoder is used, along with DMA to write to the buffer, so the operation is very efficient and does not block the execution of your code while sampling audio.
On the RTL827x, once you start PDM sampling it cannot be stopped without resetting the MCU! You can, however, simply ignore the sampled data, which will be discarded and the sampling only generates a minimal number of interrupts and uses minimal CPU.
- Full browsable API documentation
- Repository: https://github.com/particle-iot/Microphone_PDM
- License: Apache 2 (Free for use. Can be used in closed-source commercial applications. No attribution required.)
Code
Initialization
Typically you initialize the library like this:
withOutputSizetakes either:Microphone_PDM::OutputSize::UNSIGNED_8(unsigned 8-bit samples)Microphone_PDM::OutputSize::SIGNED_16(signed 16-bit samples)
withRangetakes a range, which depends on the microphone. This is the right value for the Adafruit PDM microphone (12-bit, -2048 to +2047).withSampleRatetakes a sample rate, either 8000 or 16000.init()does the initialization using the specified settings.
Starting and stopping
This can be done using Microphone_PDM::instance().start() and Microphone_PDM::instance().stop().
However, on RTL872x (P2 and Photon 2), the DMA doesn't really ever stop. These methods really only control whether the interrupt is processed or skipped over, using little CPU.
Reading samples
While the code copies samples into double (nRF52) or quad (RTL872x) buffers using DMA, it's expected that you will do something with the samples from loop() or from a worker thread. The two examples in this repository send the data over TCP, or save the data to a SD card.
This is the TCP reading example from loop(). What it does is use the noCopySamples to avoid making an extra copy of the samples, then
An alternate way would be to store the data in a temporary buffer. Use the copySamples() method instead to store in multiple buffers in a queue if you need to do lengthy blocking operations. Since the number of DMA buffers is small and fixed, copying to larger buffers is appropriate.
Examples
1 - Audio over TCP
This example sends the data as 16000 Hz, mono, 8-bit data over TCP to a node.js server. The intention is to use this with an Argon, P2, or Photon 2 over a local Wi-Fi network to a computer on the same network.
- examples/1-audio-over-tcp
Be sure to modify the IP address of your server in this line. Note the separate is comma, not a dot, like a normal IP address.
When you press the MODE button the transmission will begin and the blue D7 LED will turn on. The recording will go for 30 seconds, or until you press the MODE button again.
On the Photon 2, the status LED will turn green and blink a few times, this is normal because a single press of the MODE button also does a signal strength check like cellular devices.
You could easily modify the code to record longer, even indefinitely. It likely will not work with a Boron over cellular as there is no compression of the data and the data rate is too high. It won't work with a Xenon over mesh because TCP is not supported on a mesh-only node, and also the data rate is too high.
To run the server:
When a client connects it creates a new file in the out directory. They're sequentially numbered and in wav format.
Make sure you update the device firmware to specify the IP address of your node.js server! It will be printed out when you start the server.
2-buffer
Illustrates buffered mode which captures the data for a fixed length of time (specified in milliseconds) then passes the data at once to your code. Can be used with a callback function or lamba, or polled.
3-wav
Uses buffered mode, creates a wav file, and prints it to USB serial. You can capture this, convert it to binary, and play it with a regular wav player.
SdFat Wav
When you press the MODE button this example records audio to a SD card. Pressing MODE stops recording. Each press creates a new, sequentially numbered file in the audio directory on the SD card.
- more-examples/1-sdfat
This example requires a lot of parts:
- A compatible Particle devices
- 3.3V compatible SD card reader (connected by SPI)
- PDM microphone
Version History
0.0.1 (2023-05-12)
- Initial version